Thursday, February 21, 2019

Certificate for local dev, demos, etc.

Recently, I played around with the Habitat Home demo, from Sitecore that has replaced the good old legal demo. It can be found here by the way: https://github.com/Sitecore/Sitecore.HabitatHome.Platform.

It requires a blank Sitecore 9.1 with SXA installed. How to install that, is covered in so many blogs, so I don't want to repeat that ;).

It also requires running the site in https mode. No problem, you can just add a self signed certificate in IIS, and use that. But it has always annoyed me that the browser of course do not trust this certificate, and especially in demo scenarios, it is not cool with the "Untrusted connection" shown in the browser.

So creating a locally trusted certificate that you can use for all your local sites is a better way forward in my opinion. And instead of trawling the interweb for a guide, let me just share it here with you ;):

(This way I also have my own guide when I have forgotten the process next time I need to do it!).

Create a certificate

Easiest way I found was to run a Powershell command in Powershell ICE.

1. Open Powershell ICE in admin mode!

2. Run the following command: New-SelfSignedCertificate -DnsName *.dev.local, localhost -CertStoreLocation cert:\LocalMachine\My


Change "*.dev.local, local" to whatever makes sense for your environment. your sites bindings needs to match the domains. the * in front of dev.local means that you can use this certificate for any sites that has a url/binding that ends with dev.local, i.e. https://habitathome.dev.local/ and https://test.dev.local/

Now export the certificate

1. Open mmc.exe

2. If you have not manually messed around with certificates on your PC before, you need to add "certificates" in mmc


2.1. In mmc, click "File" -> "Add/Remove Snap-in.."

2.2. Click on "certificates" and ""Add" and choose "Computer account" -> "Local computer". Then click OK

3. Expand "Certificates (Local Computer)", "Personal", "Certificates"

4. Right click on the certificate you have created (if you used the exact command from above, it will be "*.dev.local") and choose "All tasks" -> "Export.." And follow the export wizard:

4.1. In the export wizard, choose "Yes, export the private key"

4.2. In the next screen choose "Personal Information Exchange" so the certificate will have the .pfx extension. (I do not know if this is important, but it works ;)). Leave all the check boxes as-is.

4.3. check the "Password" checkbox and give it a password you remember (obviously). The encryption does not matter (I think), so I chose the first option 

4.4. Give the exported certificate a name and choose location

4.5. Finish the wizard and you should now have a .pfx file in the chosen location

Import certificate to the trusted root store

1. Still in mmc go to "Console Root" -> "Certificates" -> "Trusted Root Certification Authorities" and right click on "Certificates"
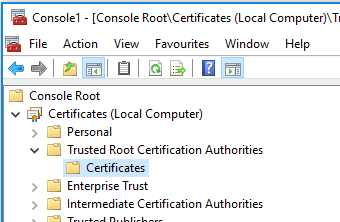


2. Choose "All tasks" -> "Import"

3. Browse for the just created .pfx certificate and follow the guide for importing the certificate, leaving all default choices as-is

That is it! now you can use your newly created, locally trusted, certificate in IIS when setting up https bindings.

remember the binding needs to match the domain you used when creating the certificate. in my case that would be something.dev.local.

 
BIG DISCLAIMER:
I do not know much about certificates, so if any of the above is stupid, does not make sense, or should be done differently, do write a comment about it!


//If you find this post informational/misleading/educational/whatever, please provide a comment.

//Also it would be nice with just a HI, so I know real people are actually seeing my posts ;)


Friday, November 2, 2018

Blank Sitecore with MVC renderings instead of Webforms

Sitecore has now supported and promoted the use of MVC as the rendering mechanism over Webforms for more than 3 years (probably a lot longer).

I think everyone agrees, that this is a good thing, although I loved creating sites using XSLT back in the days ;) (I might be very alone with this statement though?)

BUT why is the sample layout and renderings, which are part of a blank installation, still using Webforms??

Probably because it is not a big deal and those samples should not be used anyway. But I often use a blank site for a small test or to prove something to a customer/fellow partner or colleague. And it is annoying, that I need to create a new layout to be able to show the new Sitecore Forms in the workings for example.

So I recreated the sample renderings in MVC (only view renderings, so no compilation is needed) and you can download the package here so you don't have to do the same ;)

Download package

//If you find this post informational/misleading/educational/whatever, please provide a comment.

//Also it would be nice with just a HI, so I know real people are actually seeing my posts ;)

Tuesday, October 23, 2018

My blog moved back ;)

After many years, my blog has now moved back to this platform!

My (limited) contribution since moving the blog to sitecore.net can still be found here: https://community.sitecore.net/technical_blogs/b/sitecore_what39s_new, although the newest is from 2015, so probably a bit out of date.

I will start blogging about Sitecore again here (especially targeted at the not-so-experienced and new-to-the-platform audience), and first up, is about my new mantra and start of a movement #SimplifySitecoreDevelopment.

For a long while now, I have seen Sitecore solutions becoming over-engineered (in my opinion), resulting in a steep learning curve especially for new team members and developers new to Sitecore.

Also, unnecessary time is spent on developing the "perfect" code that (in theory) is easy to extend and adjust over time. What I have experienced is, that the time saved in the long term, rarely justifies the time spent building that perfect dependency-injection enabled, MVVM, service layered, etc. component as the requirement often change so much over time, that the component needs to be completely rebuild anyway. Or even more so the case, the platform is changed to another platform or upgraded to a newer version, where the whole site is redesigned and re-coded anyway! 

Sitecore is an advanced platform, allowing any imaginable customization and you have probably heard the sentence "what you can do in .Net, you can do in Sitecore" many times if you move around the Sitecore community circles! That does not mean it is a complex platform for developers, unless they make it their mission to make it complicated!

And just to make sure I don't get everyone on my neck already, #SimplifySitecoreDevelopment does not mean abandoning the great intentions in the Helix guidelines (https://helix.sitecore.net/). On the contrary, I will make sure to follow those guidelines in the coming blog posts.

Mark Cassidy @cassidydotdk delivered a great talk on this years Sitecore Symposium (a blog post about that event is also in the making ;) on the same topic, so I am not alone in my little movement ;)

First up is a rant about ORM/strongly typed field access vs native Sitecore API:

1. Why not use the Sitecore native API (not online yet)

Thursday, September 30, 2010

My blog has moved

This will be my last blog post on this adress as my blog has moved to the new Community area on Sitecore.net: http://www.sitecore.net/en/Community

You will find my blog on this url: http://www.sitecore.net/en/Community/Technical-Blogs/Morten-Ljungberg-Sitecore-Whats-New.aspx

I will be porting all my previous posts too.

Tuesday, June 1, 2010

Language switching

I am mostly writing this post because I keep forgetting how to get a language different from the current context language through the Sitecore API based on a string value. So to remind myself; here we go:

Language lang = Sitecore.Globalization.Language.Parse("da-DK");
Sitecore.Context.SetLanguage(lang, true);

From here on the language will be set as da-DK no matter what the current language is.

(Remember this blog is for new Sitecore developers! So all you hardcore Sitecore developers don't give me heat for writing about too basic stuff ;))

Tuesday, December 22, 2009

The importance of the Data Source attribute

I know that most of you probably already know the importance of actively using the data source attribute on renderings. This has become even more important with the Online Marketing Suite.

So if you are new to Sitecore or just haven't thought about using the data source yet, read on.

I am going to use the Nicam site as an example and show how we can use the same control to output different content based on the source attribute.

In the right hand image there is a control outputting the text "D3X" on a red background with a link to the D3X page. The content item that holds the information for the control is not the current context item, but rather an item that the developer has pointed to when chosen to output that control on this specific page.


The content item looks like this:


Now to change the content I could just change the values of the content item, but if I have used the "D3X - red" content item on other pages and wants to keep the content it would be smarter to use the data source attribute to point to another content item like the one above "D3X - grey".

This way I can reuse the same control over and over on different pages (or on the same page) but change the actual content by pointing to different content items through the data source attribute.

The data source attribute is found in the "Layout Details" when clicking on a control or in Design mode when highlighting a control and then clicking on properties.

Setting the data source attribute actually means that you point to a different "context" item than the one requested by the URL. So you don't need to specify anything when extracting content from a field.

for example outputting the text from a single line text field would just be:

<sc:text field="field name">

Because omitting the "select" statement means that Sitecore will use the context item.

Online Marketing Suite
Creating controls that uses the source attribute is especially important when using the OMS for personalization or multi variant testing.

This is because the Personalization rules and MV testing both uses the data source to change the content item displayed through a control based on the rules that the user set up.

Drop me a comment if you want more info about using the data source when setting up MV testing or personalization rules.

Tuesday, December 1, 2009

New icons in Sitecore 6.2

Just a quick post about the new Icons in Sitecore 6.2.

The new icons is actually just an update of the old ones to have a more Windows 7/Vista look (see small sample below).


They can be found in the Website\sitecore\shell\Themes\Standard folder as zip files together with the old icons. The icon folders have the same names as the old ones just with "V2" appended.

But when you want to use the new icons for example for a template they are not visible in the icon selector. You will still see the old ones!

To use the new ones instead of the old, rename the zip archives of the old icon zip folders to something else and then unzip the "V2" zip archives, delete the V2 from the folder name and re-zip the folder.

Now you should see the new icons